Love to share my practical experience with you! I started this blog for self reference but I am happy to see that this blog helping other as well to groom! Please feel free to provide suggestions.
That's It!!! In next post we will see how to do CRUD operation using Mongo shell commands.
Happy Learning AWS Services!!!! :) Still Doubts? lets put your questions in below comment box! Thanks! Please like and subscribe this channel. Your 1 subscription is very important to grow channel!
In this article, we will create a Lambda function using the AWS Lambda console. Then, we manually invoke the Lambda function using sample event data. AWS Lambda will execute the Lambda function and returns results. At last we will verify execution results, Lambda function and CloudWatch metrics. In our next article we will see, how to trigger AWS Lambda function from AWS resource S3.
Don't Want To Read? Watch Video:
Lets follow below steps to create and invoke a simple basic Lambda function.
1. Log in to the AWS Management Console and open the AWS Lambda service panel.
2. Click on "Create function" button
3. Then select option "Author from scratch" as we want to create a simple function.
4. Now fill up the basic information as follows:
Function name: Enter your Lambda function name. It can be any name but use only letters, numbers, hyphens, or underscores with no spaces.
Runtime: choose Python / Node.js (You can choose any version as per your requirement)
Execution role: select "Create new role from template(s)"
Role name: Enter a name for your role. But use only letters, numbers, hyphens, or underscores with no spaces
Policy templates: Leave field blank for now. For the purposes of this basic "hello world" program our Lambda function will have the necessary execution permissions.
5. Click on "Create Function" button.
Now we have created a Lambda function successfully.
See in "Function code" section, It simply returns a text "Hello from Lambda".
Handler text box shows "lambda_function.lambda_handler" value. The format is like "filename.handler-function". The console saves this sample code in the "lambda_function.py" file and in the code lambda_handler is the function name that receives the event as a parameter when the Lambda function is invoked manually or automatically from other AWS resources.
Lets follow the below steps to test this Lambda function by triggering it manually.
1. Click on "Save" button
2. In the "Configure test event page", select "Create new test event" radio button and in "Event template", leave the default "Hello World" option. Enter an "Event name"
3. Click on "Create" button and then click on "Test" button.
4. Once you click on "Save" button AWS Lambda executes your function on your behalf
5. Now you will see successful execution result logs and CloudWatch logs
Happy Learning AWS Services!!!! :) Still Doubts? lets put your questions in below comment box! Thanks! Please like and subscribe this channel. Your 1 subscription is very important to grow channel!
This is a warning not an error. When we logged in to Magento 2 admin panel first time or if we did any changes in catalog, products, categories and design configuration grid then Magento displays this warning message to update index management status. You can update this from command line interface (CLI).
Solution:
To re-index it on Windows system follow below steps.
Step 1: Go to PHP folder in XAMPP by:
>> cd C:\xampp\php
Step 2: Then execute below command for reindexing:
This will help you to indexed design config grid, Customer grid, category/products association, rule/product association, product EAV, Inventory, product/rule association, stock, product prices and Catalog product fulltext search.
Happy Learning !!!! :) Still Doubts? lets put your questions in below comment box! Thanks! Please like and subscribe this channel. Your 1 subscription is very important to grow channel!
Hello Friends, today we will see that how to install Magento 2.3.1 version on localhost using XAMPP.
Don't want to read? Watch Video:
Magento 2 is a more powerful eCommerce platform than Magento 1. I am assuming you are already aware about Magento 2 features as you want to install the Magento 2. However, If you are still interested to know about Magento 2 features, please click here for more details.
Magento 2.x supported only Linux x86-64 Operating systems like Linux distributions, such as RedHat Enterprise Linux (RHEL), CentOS, Ubuntu, Debian, and similar.
Magento 2.x is not supported Windows OS and Mac OS due security reasons however we can still install Magento 2 on Windows machine using XAMPP tool, but we must fix some known errors after installing on Windows system.
Magento 2.3.1 Min System Requirements
Apache: 2.2 or 2.4 / NGiNX 1.x+
PHP: 7.1.3 or later
MySQL: 5.6, 5.7 (Also support MySQL NDB Cluster 7.4.*, MariaDB 10.0, 10.1, 10.2, Percona 5.7 etc.)
[Optional] Other Setup Requirements to Improve Performance
Varnish Cache, Redis, Rabbit MQ, Solr & elastic
Magento 2 Sources: 1. Composer
It is a package manager for PHP
Required for developers who want to contribute to the Magento 2 codebase or develop Magento extensions.
2. ZIP File
Download from Magento website.
Let’s download latest XAMPP and Magento 2.3.1 from below links. Download XAMPP: https://www.apachefriends.org/download.html Download Magento: https://magento.com/tech-resources/download (You need to signup if you don’t have account) Step 1: Once you download the above files, first you need to install XAMPP just by some simple clicks (Go with default settings).
Step 2: Now create folder “magento2” inside path “C:\xampp\htdocs” (Assuming you installed XAMPP in C-drive) and extract downloaded Magento zip file content in newly created folder “magento2” (make sure to copy content only from extracted zip file and paste in to magento2 folder)
Step 3: Enable following required PHP extensions in C:\ xampp\php\php.ini
Search above extensions in php.ini and remove starting semi colon (;) from that line to enable it (if already not enabled) and save file.
Step 4:Create virtual host for our website.
Copy and paste host file on desktop from path C:\Windows\System32\drivers\etc\hosts (If you don’t have administrator access on your system otherwise you can directly edit host file from that location)
Now open that host file in any text editor or note pad and add following entry at last & save.
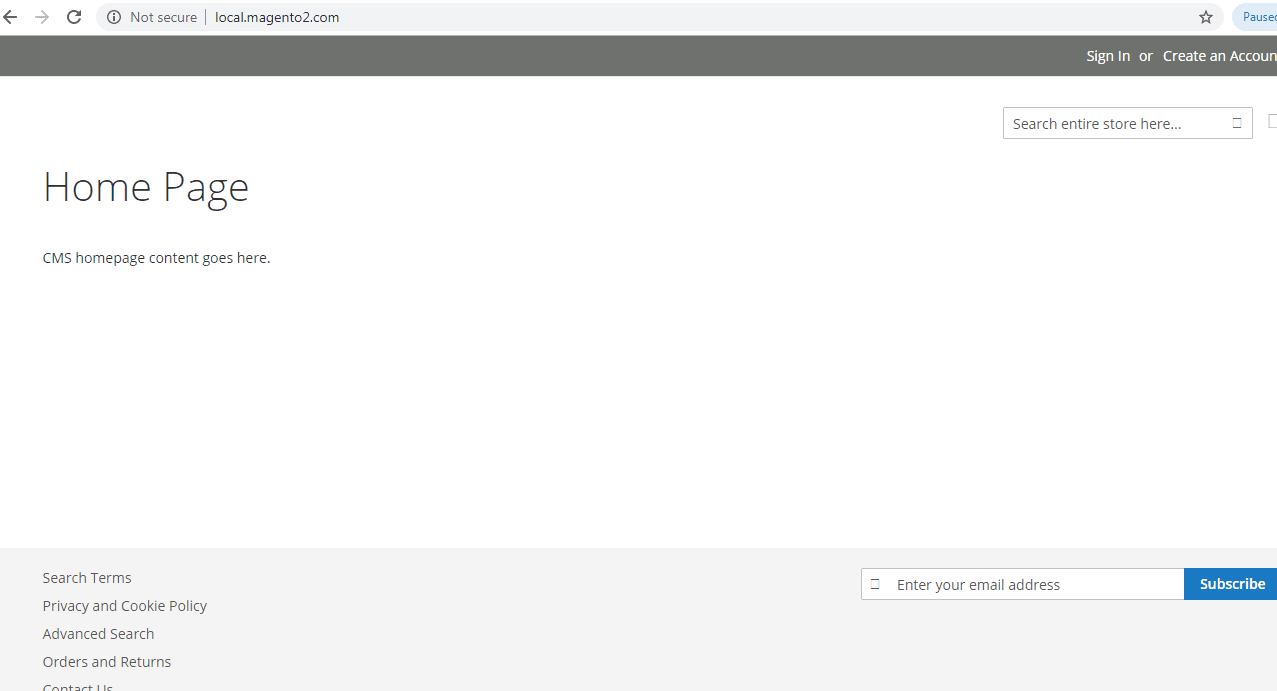
127.0.0.1 local.magento2.com
Copy modified host file and paste into this path C:\Windows\System32\drivers\etc\hosts to overwrite changes.
Now open and paste below content in C:\xampp\apache\conf\extra\httpd-vhosts.conf file (Add at last)
Once you execute this URL, it will start checking all the configurations and If there are any errors occurs it will show with red cross symbols. That errors we need to fix before proceeding to the next step. Mostly these errors were related to missing php extensions which we already enabled in previous steps so you may not get these errors.
Simply follow the below steps and install Magento 2 on localhost.
Step B: Clicks the next button and complete the installation. See below screenshots.
Step C: Set developer mode
Go to app/etc/ and open env.php and change current application mode by MAGE_MODE' => 'default' to MAGE_MODE' => 'developer'
Then, please flush the cache
(Or)
Using CLI Commands
>> bin/magento deploy:mode:set developer
Understand Application Modes
There are some more differences available. Please click here for more details.
How to fix known windows system issues:
Error 1. Validator Exception: Invalid template file magento2.3.1 in module
Error Screenshot:
Solution:
Windows uses "\" as separator, the array "directories" contains entries with "/" as separator, so the check will always fail. Open file: C:\xampp\htdocs\magento2\vendor\magento\framework\View\Element\Template\File\Validator.php
Replace below code in isPathInDirectories() function:
$realPath = str_replace('\\', '/', $this->fileDriver->getRealPath($path)); // May be line no. 138
Error 2. After installation images and Icon missing issue on frontend and admin side
Error Screenshot:
Solution:
Search and replace keyword "MaterializationStrategy\Symlink" with "MaterializationStrategy\Copy" in file C:\xampp\htdocs\magento2\app\etc\di.xml
General Instructions for Developers:
Set developer mode on development server
Enable error reporting in php.ini
display_errors = On;
error_reporting = E_ALL | E_STRICT;
If UI issue, check error in browser console
Check logs in /var/log/*
Happy Learning !!!! :) Still Doubts? lets put your questions in below comment box! Thanks! Please like and subscribe this channel. Your 1 subscription is very important to grow channel!