Nov 6, 2019

Publish Angular 7 Library To Verdaccio Private Registry On Localhost

Publish Angular 7 Library To Verdaccio Private Registry On Localhost

Verdaccio is a free private npm proxy registry built in Node.js. So if you want to publish your Angular library in private registry to access only by your network then Verdaccio registry is the best option. I hope, This may help to beginners as explained all steps in very simple way.

Click here for more details (https://verdaccio.org/)

In this tutorial, I will just explain you the simple steps to publish your Angular 7 custom library on Verdaccio private registry. I am assuming you already created your Angualr 7 library, if not then please check below tutorial first.

How to create your first angular 7 library (link)

So lets start with Verdaccio private registry setup and configuration.

Step 1: Install Verdaccio
>> npm install -g verdaccio

Step 2: Install pm2, will require to start Verdaccio service

>>npm install pm2 -g

Step 3: Run Verdaccio in background using pm2

>> pm2 start /verdaccio bin file path

In my case on windows machine: pm2 start C:/Users/userName/AppData/Roaming/npm/node_modules/verdaccio/bin/verdaccio

Step 4: Set the verdaccio registry as a source. By default original NPM registry set.

>> npm set registry http://localhost:4873/
>> npm set ca null

Step 5: Registering a user in verdaccio registry

>> npm adduser --registry http://localhost:4873

It will ask for username, password and valid email id to be entered. Make a note of this details that will use to login in verdaccio registry to publish our library.

Step 6: Go to angular workspace "libraryCollection"
>> cd libraryCollection

Step 7: Login into verdaccio registry. Enter the same username, password and email id set in Step 5.
>> npm login

Step 8: Go to /libraries/dist/your-library-name/your-library-name-0.0.1.tgz
>> cd libraries
>> cd dist
>> cd your-library-name

Step 9: Finally publish our library your-library-name-0.0.1.tgz on verdaccio registry

>> npm publish your-library-name-0.0.1.tgz

Now browse http://localhost:4873 and you will see new our library package there.

That's it. If you want to use your verdaccio library package from other Angular project then follow these steps.

Step 1: If you already have other angular application then go to root of that application or create new app using below commands.

>> ng new new-project

Step 2: Go to root of your new project and our library package from verdaccio registry.
>> cd new-project
>> npm install your-library-name

Step 3: Now we can import it in app.module.ts of new project

import { YourLibraryNameModule } from 'your-library-name';
@NgModule({
  declarations: [
    AppComponent
  ],
  imports: [
    BrowserModule,
    YourLibraryNameModule
  ],
  providers: [],
  bootstrap: [AppComponent]
})

Step 4: Lets add our library selector tag "your-prefix-name-your-library-name" in app.component.html to display library component content.

Lets assume, your-prefix-name = webtechfunda and your-library-name = myfirstlib
then the tag will be like below.


Step 6: Run your new project by using below command and check output. you should see your library content on your new application page.

>> ng serve -o


Conclusion:

That's It Guys! At the time of writing (Nov 2019), I am not an Angular 7 expert but shared this knowledge with you whatever I experienced while learning. So if you have any opinions or suggestion related to this tutorial, Please feel free to comment and share your suggestions.


Check Recommended Articles:
How To Uninstall Verdaccio From Angular 7 Workspace
How to create your first angular 7 library

How To Uninstall Verdaccio From Angular 7 Workspace

How To Uninstall Verdaccio From Angular 7 Workspace

Step 1: Uninstall verdaccio from your machine
>> npm uninstall -g verdaccio

Step 2: Now set back npm registry as a default npm registry instead verdaccio regitry. Run this command.

>> npm set registry https://registry.npmjs.org // for HTTPS access

{or}

>> npm set registry http://registry.npmjs.org // for HTTP access


Conclusion:

That's It Guys! I loved to share my knowledge with you whatever I experienced while learning. If you have any opinions or suggestion related to this tutorial, Please feel free to comment and share your suggestions.


Check Recommended Articles:

How to create your first angular 7 library 
How To Publish Angular 7 Library To Verdaccio Private Registry On Localhost 
Free Verdaccio Private Registry Setup On AWS 

How To Create Your First Angular 7 Library

How-To-Create-Your-First-Angular-7-Library

In this article, we will see how to create a simple Angular 7 library step by steps. I will mainly focus on commands and configurations required for library. At the time of writing (Nov 2019), I am not an Angular 7 expert but still sharing this knowledge with you whatever I experienced while learning. I hope, This may help to beginners as explained all steps in very simple way.

If you want know in details please click here.(https://angular.io/guide/creating-libraries)

Step 1: Create an Angular Workspace with no initial application

>> ng new libraryCollection --create-application=false

Step 2: Go to newly created angular workspace "libraryCollection"

>> cd libraryCollection

Step 3: Create your first library by running below command.

>> ng generate library your-library-name --prefix your-prefix-name

Note your-library-name and your-prefix-name can be anything but make sure to use unique name, if in future you wanted to publish that on NPM or Verdaccio registry.

Once you done with Step 3, you will see your library "your-library-name" generated under directory "libraryCollection->projects->your-library-name" and below files generated in "src -> lib" directory.


  • your-library-name.component.spec.ts
  • your-library-name.component.ts
  • your-library-name.module.ts
  • your-library-name.service.spec.ts
  • your-library-name.service.ts


Also one very important file will get generated i.e public-api.ts. This file is the entry point of our library to declare what components, services or modules we want to export so that can be imported from other Angular applications.

Step 4: Now we will build library using below command
>> cd libraries
>> ng build your-library-name

Once you execute above command, it will generate a built in this directory path -> libraries\dist\your-library-name
That means you have successfully built your library.

Step 5: Lastly, it's time to create a package of our library so that we can use that package from other Angular projects. It will generate a tar file under directory -> libraries\dist\your-library-name\your-library-name-0.0.1.tgz

>> cd libraries\dist\your-library-name
>> npm pack pgondane-lib

That's it. If you want to use your library package then follow these steps.

Step 1: If you already have other angular application then go to root of that application or create new app using below commands.

>> ng new new-project

Step 2: Open new project new-project\package.json file, search for keyword "rxjs" and add below line above it.

Example: 

"your-library-name": "../libraries/dist/your-library-name/your-library-name-0.0.1.tgz",
"rxjs": "~6.4.0",

Step 3: Go to root of your new project and install our library package.
>> cd new-project
>> npm install your-library-name

Step 4: Now we can import it in app.module.ts of new project

import { YourLibraryNameModule } from 'your-library-name';
@NgModule({
  declarations: [
    AppComponent
  ],
  imports: [
    BrowserModule,
    YourLibraryNameModule
  ],
  providers: [],
  bootstrap: [AppComponent]
})

Step 5: Lets add our library selector tag "your-prefix-name-your-library-name" in app.component.html to display library component content.

Lets assume, your-prefix-name = webtechfunda and your-library-name = myfirstlib
then the tag will be like below.


Step 6: Run your new project by using below command and check output. you should see your library content on your new application page.

>> ng serve -o

Conclusion:

That's It Guys! At the time of writing (June 2019), I am not an Angular 7 expert but shared this knowledge with you whatever I experienced while learning. So if you have any opinions or suggestion related to this tutorial, Please feel free to comment and share your suggestions.


Check Recommended Article:
How To Publish Angular 7 Library To Verdaccio Private Registry On Localhost

Free Verdaccio Private Registry Setup On AWS

Free Verdaccio Private Registry Setup On AWS

Verdaccio registry is a free private npm proxy registry which made in NodeJS. We can setup our private NPM application / libraries with free of cost. The benefit of this registry is privacy, only authorized persons can access this registry and can use published libraries or applications. I hope, This may help you to start learning and utilizing free Verdaccio private registry for your company, organization or individuals.

Click here for more details (https://verdaccio.org/)

In this tutorial, I will just explain you the simple steps to setup Verdaccio private registry on Amazon Web Services platform using EC2 service. I am assuming you already created EC2 Amazon Linux instance, if not then please check below tutorial first.

AWS CLI Commands For AWS EC2 (Amazon Elastic Compute Cloud) (https://tinyurl.com/y2ozksyc)

So lets start with Verdaccio private registry setup and configuration.

Step 1: Open SSH & Login in using your EC2 key.

Step 2: Install Node Version Manager (nvm) first

wget -qO- https://raw.githubusercontent.com/creationix/nvm/v0.33.11/install.sh | bash

Step 3: Install Node using Node Version Manager (nvm)

>> nvm install node

Step 4: Install Verdaccio & pm2, will require to run Verdaccio service in background

>> npm i -g verdaccio pm2

Step 5: Set the verdaccio registry as a source. By default original NPM registry set.
>> npm set registry http://localhost:4873
>> npm set ca null

Step 6: Run Verdaccio and stop it. It will create a config file we will use.

>> verdaccio

Step 7: Now do below configuration for listening to all addresses on that server machine / EC2 instance.

Click here for more details: https://github.com/verdaccio/verdaccio/blob/master/conf/full.yaml

Open and edit config.yaml file:

>> nano .config/verdaccio/config.yaml

Add below lines at the end. Click here for more details. https://github.com/verdaccio/verdaccio/blob/ff409ab7c05542a152100e3bc39cfadb36a8a080/conf/full.yaml#L113

listen:
  - 0.0.0.0:4873

Change below line so that only authenticated person can access our registry

Replace "access: $all" with "access: $authenticated"

There are some more parameters available to configure it. Like storage, proxy, default port change. Click here for more details. https://github.com/verdaccio/verdaccio/blob/ff409ab7c05542a152100e3bc39cfadb36a8a080/conf/full.yaml#L113

Step 8:Run Verdaccio in background using PM2:

pm2 start verdaccio

Step 9: Now, You can access your Verdaccio web UI.

The URL will look like something:

http://ec2-..compute.amazonaws.com:4873

{or}

http://your-ec2-public-ip-address:4873 (You can check your EC2 instance public ip from AWS console)

To confirm verdaccio running status, run the command below
>> pm2 list

Step 10: Registering a user in verdaccio registry

>> npm set always-auth true
>> npm adduser

It will ask for username, password and valid email id to be entered. Make a note of this details that will use later to login in verdaccio registry to publish our library.


Step 11: Now we are ready to use our AWS server instance work as a private registry.

Login into verdaccio registry. Enter the same username, password and email id set in above Step.

>> npm set registry http://your-ec2-public-ip-address:4873
>> npm login

Step 12: Go to your custom library package path. In my case this is my Angular 7 package path -> /libraries/dist/your-library-name/your-library-name-0.0.1.tgz

If you like to know how to create angular 7 library/package then click here (link)

>> cd [custom library package path]

Step 9: Finally publish our library your-library-name-0.0.1.tgz on verdaccio registry

[custom library package path] >> npm publish your-library-name-0.0.1.tgz

{or}

[custom library package path] >> npm publish

{or}

[custom library package path] >> npm publish --registry http://your-ec2-public-ip-address:4873

Now browse http://your-ec2-public-ip-address:4873 and you will see new our library package there.


Conclusion:

That's It Guys! I loved to share my knowledge with you whatever I experienced while learning. If you have any opinions or suggestion related to this tutorial, Please feel free to comment and share your suggestions.


Check Recommended Articles:

How to create your first angular 7 library 
How To Publish Angular 7 Library To Verdaccio Private Registry On Localhost 
How To Uninstall Verdaccio From Angular 7 Workspace 

Jun 15, 2019

Install and Configure MongoDB on AWS EC2 Linux Instance

Install and Configure MongoDB on AWS EC2 Linux Instance


In this tutorial, I will show you how to install and configure MongoDB on AWS EC2 Linux instance.

Don't Want To Read? Watch Video:


Please follow below steps one by one to install and configure properly.

Step 1: Create the below file using nano or any other editor for MongoDB

>> sudo nano /etc/yum.repos.d/mongodb-org-4.0.repo

and add the below content in the above file:

[mongodb-org-4.0]
name=MongoDB Repository
baseurl=https://repo.mongodb.org/yum/amazon/2013.03/mongodb-org/4.0/x86_64/
gpgcheck=1
enabled=1
gpgkey=https://www.mongodb.org/static/pgp/server-4.0.asc

Note: You can check latest MongoDB repository version from here https://repo.mongodb.org/yum/amazon/2013.03/mongodb-org/ and change it in above content and command as per requirement.

Step 2: Install MongoDB using below command

>> sudo yum install -y mongodb-org

Step 3: Start MongoDB service using below command

>> sudo service mongod start

Step 4: Start MongoDB on EC2 instance reboot
This is optional, if you want to start MongoDB after EC2 instance reboot then use command below

>> sudo chkconfig mongod on

Once the service is started, We can connect to Mongo shell using below command:

>> mongo

Check existing databases using below command

>> show dbs

Step 6: We can select database using below command

>> use admin


#Uninstall MongoDB Community Edition

Step 1: Stop mongod process by using following command:

>> sudo service mongod stop


Step 2: Remove MongoDB packages which we had installed previously

>> sudo yum erase $(rpm -qa | grep mongodb-org)

Step 3: Remove data directories like MongoDB databases and log files.

>> sudo rm -r /var/log/mongodb
>> sudo rm -r /var/lib/mongo


That's It!!! In next post we will see how to do CRUD operation using Mongo shell commands.

Happy Learning AWS Services!!!! :) Still Doubts? lets put your questions in below comment box! Thanks! 

Please like and subscribe this channel. Your 1 subscription is very important to grow channel!


Create Simple AWS Lambda Function & Invoke Manually

Create Simple AWS Lambda Function & Invoke Manually


In this article, we will create a Lambda function using the AWS Lambda console. Then, we manually invoke the Lambda function using sample event data. AWS Lambda will execute the Lambda function and returns results. At last we will verify execution results, Lambda function and  CloudWatch metrics. In our next article we will see, how to trigger AWS Lambda function from AWS resource S3.

Don't Want To Read? Watch Video:


Lets follow below steps to create and invoke a simple basic Lambda function.

1. Log in to the AWS Management Console and open the AWS Lambda service panel.


2. Click on "Create function" button

3. Then select option "Author from scratch" as we want to create a simple function.


4. Now fill up the basic information as follows:

Function name: Enter your Lambda function name. It can be any name but use only letters, numbers, hyphens, or underscores with no spaces.

Runtime: choose Python / Node.js (You can choose any version as per your requirement)

Execution role: select "Create new role from template(s)"

Role name: Enter a name for your role. But use only letters, numbers, hyphens, or underscores with no spaces

Policy templates: Leave field blank for now. For the purposes of this basic "hello world" program our Lambda function will have the necessary execution permissions.


5. Click on "Create Function" button.

Now we have created a Lambda function successfully.

See in "Function code" section, It simply returns a text "Hello from Lambda".


Handler text box shows "lambda_function.lambda_handler" value. The format is like "filename.handler-function". The console saves this sample code in the "lambda_function.py" file and in the code lambda_handler is the function name that receives the event as a parameter when the Lambda function is invoked manually or automatically from other AWS resources.

Lets follow the below steps to test this Lambda function by triggering it manually.

1. Click on "Save" button

2. In the "Configure test event page", select "Create new test event" radio button and in "Event template", leave the default "Hello World" option. Enter an "Event name"


3. Click on "Create" button and then click on "Test" button.

4. Once you click on "Save" button AWS Lambda executes your function on your behalf

5. Now you will see successful execution result logs and CloudWatch logs


Happy Learning AWS Services!!!! :) Still Doubts? lets put your questions in below comment box! Thanks!

Please like and subscribe this channel. Your 1 subscription is very important to grow channel!


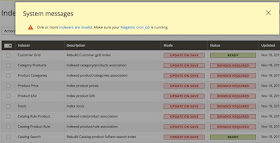
Fix Magento 2 admin warning on Windows localhost: One or more indexers are invalid. Make sure your Magento cron job is running

indexer-are-invalid


This is a warning not an error. When we logged in to Magento 2 admin panel first time or if we did any changes in catalog, products, categories and design configuration grid then Magento displays this warning message to update index management status. You can update this from command line interface (CLI).

Solution:

To re-index it on Windows system follow below steps.

Step 1: Go to PHP folder in XAMPP by:

>> cd C:\xampp\php

Step 2: Then execute below command for reindexing:

>> php C:\xampp\htdocs\magento2\bin\magento indexer:reindex


reindex-by-cli


This will help you to indexed design config grid, Customer grid, category/products association, rule/product association, product EAV, Inventory, product/rule association, stock, product prices and Catalog product fulltext search.

Happy Learning !!!! :) Still Doubts? lets put your questions in below comment box! Thanks! 

Please like and subscribe this channel. Your 1 subscription is very important to grow channel!


Jun 2, 2019

Magento 2.x Does Not Support Windows & Mac?

Magento 2.3.1 Does Not Support Windows & Mac


Hello Friends, today we will see that how to install Magento 2.3.1 version on localhost using XAMPP.

Don't want to read? Watch Video:


Magento 2 is a more powerful eCommerce platform than Magento 1. I am assuming you are already aware about Magento 2 features as you want to install the Magento 2. However, If you are still interested to know about Magento 2 features, please click here for more details.

Magento 2.x supported only Linux x86-64 Operating systems like Linux distributions, such as RedHat Enterprise Linux (RHEL), CentOS, Ubuntu, Debian, and similar.

Magento 2.x is not supported Windows OS and Mac OS due security reasons however we can still install Magento 2 on Windows machine using XAMPP tool, but we must fix some known errors after installing on Windows system.

Magento 2.3.1 Min System Requirements

Apache: 2.2 or 2.4    / NGiNX 1.x+
PHP: 7.1.3 or later
MySQL: 5.6, 5.7 (Also support MySQL NDB Cluster 7.4.*, MariaDB 10.0, 10.1, 10.2, Percona 5.7 etc.)

Memory Requirement
Min 2 GB RAM recommended

For more details check this https://devdocs.magento.com/guides/v2.3/install-gde/system-requirements-tech.html

[Optional] Other Setup Requirements to Improve Performance

Varnish Cache, Redis, Rabbit MQ, Solr & elastic

Magento 2 Sources:

1. Composer

  • It is a package manager for PHP
  • Required for developers who want to contribute to the Magento 2 codebase or develop Magento extensions.


2. ZIP File

  • Download from Magento website.


Let’s download latest XAMPP and Magento 2.3.1 from below links.

Download XAMPP: https://www.apachefriends.org/download.html
Download Magento: https://magento.com/tech-resources/download (You need to signup if you don’t have account)

Step 1: Once you download the above files, first you need to install XAMPP just by some simple clicks (Go with default settings).


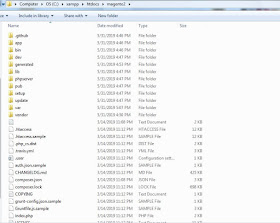
Step 2: Now create folder “magento2” inside path “C:\xampp\htdocs” (Assuming you installed XAMPP in C-drive) and extract downloaded Magento zip file content in newly created folder “magento2” (make sure to copy content only from extracted zip file and paste in to magento2 folder)


Step 3: Enable following required PHP extensions in C:\ xampp\php\php.ini
extension=curl
extension=pdo_sqlite
extension=pdo_mysql
extension=soap
extension=xsl
extension=intl

Search above extensions in php.ini and remove starting semi colon (;) from that line to enable it (if already not enabled) and save file.


Step 4: Create virtual host for our website.
Copy and paste host file on desktop from path C:\Windows\System32\drivers\etc\hosts (If you don’t have administrator access on your system otherwise you can directly edit host file from that location)

Now open that host file in any text editor or note pad and add following entry at last & save.

127.0.0.1       local.magento2.com

Copy modified host file and paste into this path C:\Windows\System32\drivers\etc\hosts to overwrite changes.


Now open and paste below content in C:\xampp\apache\conf\extra\httpd-vhosts.conf file (Add at last)

    ServerAdmin local.magento2.com
    DocumentRoot "C:/xampp/htdocs/magento2"
    ServerName local.magento2.com
    ServerAlias local.magento2.com


Step 5: Start Apache and MySql service from XAMPP control panel.

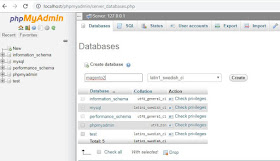
Step 6: Create a new empty database with name “magento2” from PHPMyAdmin

Please note default username will be “root” and password blank.

PHPMyAdmin URL: http://localhost/phpmyadmin/ or http://local.magento2.com/phpmyadmin/ (as we have created virtual host)


Step 7: Access this URL ( http://local.magento2.com ) to install and configure Magento 2

Once you execute this URL, it will start checking all the configurations and If there are any errors occurs it will show with red cross symbols. That errors we need to fix before proceeding to the next step. Mostly these errors were related to missing php extensions which we already enabled in previous steps so you may not get these errors.

Simply follow the below steps and install Magento 2 on localhost.

Step A: Run this URL http://local.magento2.com on browser.

Step B: Clicks the next button and complete the installation. See below screenshots.


Step C: Set developer mode

Go to app/etc/ and open env.php and change current application mode by MAGE_MODE' => 'default' to MAGE_MODE' => 'developer'

Then, please flush the cache

(Or)

Using CLI Commands
>> bin/magento deploy:mode:set developer

Understand Application Modes


There are some more differences available. Please click here for more details.


How to fix known windows system issues:

Error 1. Validator Exception: Invalid template file magento2.3.1 in module

Error Screenshot:


Solution:

Windows uses "\" as separator, the array "directories" contains entries with "/" as separator, so the check will always fail.

Open file: C:\xampp\htdocs\magento2\vendor\magento\framework\View\Element\Template\File\Validator.php

Replace below code in isPathInDirectories() function:

$realPath = str_replace('\\', '/', $this->fileDriver->getRealPath($path)); // May be line no. 138


Error 2After installation images and Icon missing issue on frontend and admin side

Error Screenshot:


Solution:

Search and replace keyword "MaterializationStrategy\Symlink" with "MaterializationStrategy\Copy" in file C:\xampp\htdocs\magento2\app\etc\di.xml


General Instructions for Developers:

Set developer mode on development server
Enable error reporting in php.ini
display_errors = On;
error_reporting = E_ALL | E_STRICT;
If UI issue, check error in browser console
Check logs in /var/log/*

Happy Learning !!!! :) Still Doubts? lets put your questions in below comment box! Thanks! 

Please like and subscribe this channel. Your 1 subscription is very important to grow channel!


May 29, 2019

Simply Calculate AWS Subnet's CIDR Blocks For VPC

aws-subnets-cidr-blocks-simply-calculate

Don't want to read? Watch Video:


VPC and Subnet Basics (AWS Definition):

A virtual private cloud (VPC) is a virtual network dedicated to your AWS account. It is logically isolated from other virtual networks in the AWS Cloud. You can launch your AWS resources, such as Amazon EC2 instances, into your VPC.

When you create a VPC, you must specify a range of IPv4 addresses for the VPC in the form of a Classless Inter-Domain Routing (CIDR) block; for example, 10.0.0.0/16. This is the primary CIDR block for your VPC.

vpc-subnets-structure


What is CIDR Blocks ?

It is a Classless Inter-Domain Routing.

ip-address-structure


How to decide IPv4 address range ?

While creating a VPC, AWS recommend that you specify a CIDR block (of /16 or smaller network prefix) from the iana (Internet Assigned Numbers Authority) standard private IPv4 address ranges:

  • 10.0.0.0 - 10.255.255.255 (/8 prefix)

  • 172.16.0.0 - 172.31.255.255 (/12 prefix)

  • 192.168.0.0 - 192.168.255.255 (/16 prefix)

Available IPs Depends On N/W Prefix:

Example: 192.168.0.0 /16 (n/w prefix)

Formula: 
Total Available Host Bits = Total Bits – n/w Prefix
Total Available IPs = 2^ Total Available Host Bits
Total Available Host Bits =  32 bits – 16bits = 16
Total Available IPs = 2^16 = 65536 Ips

How to choose CIDR block for VPC?


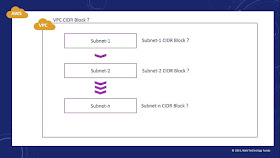
vpc-cidr-blocks-subnets


It’s totally depends on your IP addresses requirement and numbers of subnets you want to create.

For example, we have requirement of 200 Ips and want to allocate 100 Ips in subnet-1 and remaining 100 ips in subnet-2

Lets find out total available Ips using different n/w prefix.

  • Example-1: 192.168.0.0 /16 (n/w prefix) => 65536 Ips
  • Example-2: 192.168.0.0 /20 (n/w prefix) => 4096 Ips
  • Example-3: 192.168.0.0 /23 (n/w prefix) => 512 Ips
  • Example-4: 192.168.0.0 /24 (n/w prefix) => 256 Ips (Most suitable)
  • Example-5: 192.168.0.0 /25 (n/w prefix) => 128 Ips

Lets calculate CIDR block for subnets:

Example-1:
192.168.0.0 /25 (n/w prefix) => 32-25 = 7 = 2^7 = 128 Ips (Most suitable)

Example-2:
192.168.0.0 /26 (n/w prefix) => 32-26 = 6 = 2^6 = 64 Ips (less, as we need 100 Ips)

Example-3:
192.168.0.0 /27 (n/w prefix) => 32-27 = 5 = 2^5 = 32 Ips (less, as we need 100 Ips)

Example-4: 
192.168.0.0 /28 (n/w prefix) => 32-28 = 4 = 2^4 = 16 Ip (less, as we need 100 Ips)

start-end-ip-range


AWS Reserved 5 IP Addresses:

The first four IP addresses and the last IP address in each subnet CIDR block are not available for you to use, and cannot be assigned to an instance. For example, in a subnet with CIDR block 192.168.0.0/25, the following five IP addresses are reserved:

  • 192.168.0.0: Network address.
  • 192.168.0.1: Reserved by AWS for the VPC router.
  • 192.168.0.2: Reserved by AWS for future use.
  • 192.168.0.3: Reserved by AWS for future use.
  • 192.168.0.127: Reserved for Network broadcast address.
usable-ip-range


For More Details: https://docs.aws.amazon.com/vpc/latest/userguide/VPC_Subnets.html

Calculate Subnet CIDR Blocks Tool:

There are many tools available to help you calculate subnet CIDR blocks.

My favorite one is :  
http://www.davidc.net/sites/default/subnets/subnets.html


Happy Learning AWS Services!!!! :) Still Doubts? lets put your questions in below comment box! Thanks! 

Please like and subscribe this channel. Your 1 subscription is very important to grow channel!


Mar 17, 2019

Install Free Third Party SSL (6 Months) On AWS EC2 Linux Server

Install Free Third Party SSL (6 Months) On AWS EC2 Linux Server

In this tutorial, I will explain how we can get free SSL for 6 months and apply on our AWS EC2 Linux instance via command line interface. Please make a note this not for lifetime, if you need it for many years then you can renew this SSL from respective providers.

Don't want to read? Watch video!


Get Free SSL For 6 Months:

Go to www.sslforfree.com and enter your website name.

Select "Manual Verification" option


Go to project root directory and create a directory ".well-known" if it does not already exist. Create another folder under ".well-known" directory named as "acme-challenge" if it does not already exist.

Download the "Download File #1" and "Download File #2" verification files by clicking on each link.

Now upload the above downloaded files to the "acme-challenge" directory.

Verify successful upload by visiting the links display in your dashboard.

If the files do not show random alphanumeric characters or shows an error then recheck that you are uploading in the correct place.

Click on "Download SSl Certificate Files" button to get all SSL certificate files in compressed format.


Extract all above certificates files and upload to root project directory then from there we will move files to proper locations.

  • sudo cp private.key /etc/httpd/conf/private.key
  • sudo cp certificate.crt /etc/httpd/conf/certificate.crt
  • sudo cp ca_bundle.crt /etc/httpd/conf/ca_bundle.crt  (Optional File)

Lets confirm if SSL already installed or not

  • cd /etc/httpd/conf.d
  • ls -l-a-bruket

If you can't see ssl.conf file that means no SSl installed yet.

Lets install SSL module

  • sudo yum install mod_ssl

Edit file ssl.conf 

  • sudo nano ssl.conf

Search keyword "SSLCertificateFile", "SSLCertificateKeyFile" and "SSLCertificateChainFile" and comment all out by putting # at starting of line.

Copy and paste below lines in ssl.conf file after commented line #SSLCertificateChainFile

  • SSLCertificateFile /etc/httpd/conf/certificate.crt
  • SSLCertificateKeyFile /etc/httpd/conf/private.key
  • SSLCertificateChainFile /etc/httpd/conf/ca_bundle.crt

Save and close the file ssl.conf

Now confirm if there any syntax error in ssl.conf file

  • apachectl -t

Restart apache server using command below

  • sudo systemctl restart httpd 


That's It! Now try to access your website with https://yourwebsite.tl

Happy Learning AWS Services!!!! :) Still Doubts? lets put your questions in below comment box! Thanks!

Mar 3, 2019

Get 1 year free domain and point to AWS EC2 instance using Route53

Get 1 year free domain and point to AWS EC2 instance using Route53


Don't want to read? Watch video!


We can get free domain for 1 year for our personal websites or blogs. This domain contains top level domains like .tk, .ml, .ga, .cf and .gq etc. After one year you can renew this domain or create new free domain again with different email id.

Lets follow below steps to create new free domain and configure with AWS EC2 instance using route 53 service.

Get Free Domain For 1 Year:

Go to freenom.com and search for your new domain name once list populated, select only .tk, .ml, .ga, .cf and .gq top level domain which having 0 charge for a year and less.

Get 1 year free domain and point to AWS EC2 instance DNS


Click on "Get It Now" button and then click on "Checkout" button

Select "12Months@Free" option from "Period" section and click on "Continue" button

Get 1 year free domain and point to AWS EC2 instance DNS


Now create a temporary email address using "ThrowAwayMail.com" website or you can also use your personal email address.

Enter email address and click on "Verify My Email Address" button

Get 1 year free domain and point to AWS EC2 instance DNS


You will receive verification email on provided email address. Click on link to verify it.

Once you done with the verification, it will ask to complete some other information. Complete that and click on "Save/Update" button.

Get 1 year free domain and point to AWS EC2 instance DNS


To confirm your new free domain activated or not, just go to menu Service -> My Domain.

Now we have created free domain for a year, so lets configure domain with hosting DNS. Here i am using AWS EC2 instance as my hosting server.


Point Free Domain To AWS EC2 Instance DNS:

Assuming you already created a Linux EC2 instance with LAMP setup. If not you can refer these links.


Usually domain address takes time to update global DNS but mostly update within 10 to 15 minutes.

Go to AWS console and open "Route 53" service then click on "Create Hosted Zone" button.

Get 1 year free domain and point to AWS EC2 instance DNS


Enter your newly created domain name in related text box and click on "Create" button.

Add "A" record in same section as below

Name: www
Value: Your EC2 Instance Public IP or Elastic IP Address

Add one more "A" record for alias as below

Name: Keep this field blank
Alias: Select radio button "Yes"
Alias Target: Select your domain name from list

Get 1 year free domain and point to AWS EC2 instance DNS


Once you created above hosted zone, it will generates four NS records which we need to add into free domain Name Server setting.

Go to freenom.com dashboard and click on menu "Management Tools" -> "Nameservers".

Add all four NS records one by one and click on "Change Nameservers" button.

Get 1 year free domain and point to AWS EC2 instance DNS


That's It! Now try to access your website.


Next article is "Install Free Third Party SSL (6 Months) On AWS EC2 Linux Server"

Happy Learning AWS Services!!!! :) Still Doubts? lets put your questions in below comment box! Thanks!